|
General
•
Installation
•
HTML Tips
•
EOS tab
•
Edit tab
Advanced tab
•
Template files
•
Regeneration
General
The EOS HTML template can be used with JAlbum (version 5.1 or higher). If you already use version 6 then please follow this link.
Update - Feb. 2007:
The EOS template has been updated for JAlbum 7. If you have upgraded to version 7 then please read the instructions for JAlbum 7.
Before you start using the EOS template you should get comfortable in generating HTML galleries with JAlbum. Read the help files or read the user manual online. If you have a specific question regarding the application itself (not EOS related) then please post to the http://jalbum.net/forum/index.jspa" target="_blank">JAlbum forum. It is monitored by the developer, David Ekholm.
Installing the Template
Note that JAlbum comes with several templates which are called "skins". There is no difference between a skin and a template, it's just another word for the same thing.
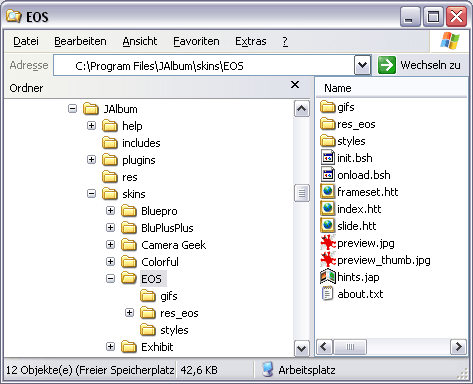
You can download the EOS template file from the Yahoo! group's Files section. After extracting the ZIP file you must copy the EOS folder into the "skins" directory of your JAlbum installation. Make sure that the subdirectory "res_eos" exists. Sometimes subfolders are not created when you do not use a proper unzip tool. Note that you can rename the EOS skin folder without affecting the functionality. That means you can install multiple versions of the EOS template if you like.
Start JAlbum and check your version (Help → About).
The EOS template has been tested with 5.1 and 5.2.
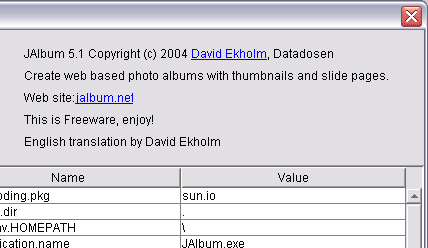
Hint: if your JAlbum interface is not shown in English but you would prefer the English version then go to the "texts" subfolder of the JAlbum installation directory and rename the localization file of your language. Then start JAlbum again. If it does not find the correct localization file it will show the English version.
Important:
The template is now installed. But you cannot create a gallery yet if you use the template version 2.5 (or higher). That's because in that version a shared settings concept has been introduced. Please read 'How to set up an EOS project' now. Then come back to read some tips for the gallery generation with JAlbum.
HTML generation tips
Main Tab
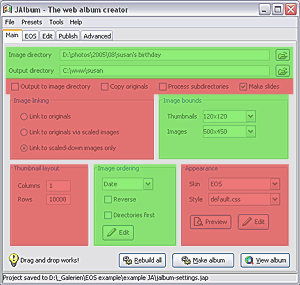
Go to the Appearance section in the Main tab and select the EOS skin. Then choose the Image directory (also called source or input folder) and the Output directory. If you use version 2.5 (or higher) of the EOS template the output directory should be underneath the EOS project folder.

Feel free to to change the Image bounds (size in pixels) but keep in mind that your clients do not sit in front of a 1600x1200 pixel screen like you probably do. You can also alter the Image ordering using a text editor. Note that version 6 of JAlbum will offer a very nice Explorer-like image selection and ordering interface!

Do not change the values for the following settings:
- Output to image directory (unchecked)
- Copy originals (unchecked)
- Process subdirectories (unchecked)
- Make slides (checked)
- Image linking: Link to scaled-down images only (selected)
- Thumbnail layout: Columns (1), Rows (10000)
The HTML gallery may not work properly if you change any of the parameters from the list above! In the next image you can see main tab where the editable fields are marked with green. The fields which should not be changed once the EOS skin is selected are marked with red.
EOS Tab
The EOS template has it's own tab. It gets appended to the tab list after you have selected the EOS skin in the Main tab.
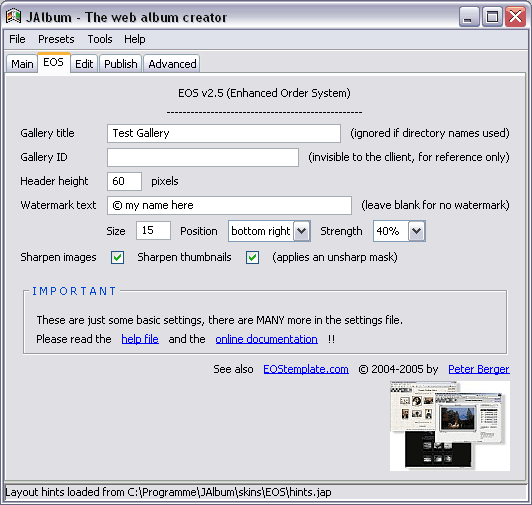
In the first line you can enter a Gallery title. Note that this entry will be ignored (only in version 2.5) if you set one of the following variables in the settings file: useSDirNameAsTitle or useDDirNameAsTitle. More about the settings file later.
Underneath is an input field for a Gallery ID (v2.5). This ID is an optional code and can be any text string. It cannot be seen by the customer, it's only for your reference in the order logfiles.
Below you can set the Header height which is the height of the top frame in pixels. The value depends on the size of your logo image. If you use a logo with 60 pixels height you can leave that field untouched.
The Watermerk text will be added to the web-sized image. It will appear as a semi-transparent text. You can set text size (in points), position and strength (0% = invisible, 100% = no transparency). The font type can be changed if you open the file "init.bsh" (in the EOS template folder) and scroll to the bottom where the watermark filter is defined.
At last you can Sharpen images and thumbnails. This will look much better but it also increases the generation time.
Edit Tab
In this interface you view and/or add image captions. First you need to import the images from the input folder. Click on Get images from album but be prepared that this may take some time to load.

If you have used a different tool to add comments into the "IPTC Caption" data field you can view them here when you click on the IPTC button in the Comment Extraction area. Note that if you edit the text and then click on "Write to image" the comments text gets duplicated in the "JPEG comment" data field! JAlbum cannot update IPTC data.
Instead of just viewing you can also create image captions. If you enter some text and then move to the next image the text gets automatically saved in an external file. Alternatively you can click "Write to image" to save the text in the JPEG comment field. It makes no difference where the image caption is stored just make sure that JAlbum will read it from your field of choice. See "Comment source" in the Advanced tab (below).
If you have Adobe bridge installed (file browser that comes with Photoshop CS) then I recommend to use this tool for adding IPTC data. It also allows batch editing of the metadata. At some point you might wonder if your IPTC data is really stored at the right place and if JAlbum is able to read it correctly. In this case I recommend to install the (free) MetaData template for JAlbum and check the raw data fields.
Advanced Tab
It is necessary to check Extract photographic data (EXIF) in this tab. If it is unchecked no meta data will be read! That means you cannot use sections, special items or image descriptions (if stored in the IPTC fields). Furthermore the shooting data (EXIF) will show "not available" in the gallery.
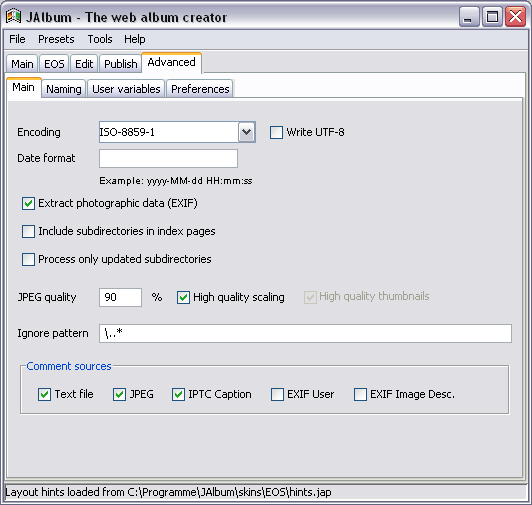
I recommend to set a good JPEG quality, like 90%, and enable High quality scaling. Together with the sharpening option of the EOS template this will produce very nice images for the web.
With the Ignore pattern you could exclude special files or directories. Usually it is not needed. The standard pattern \..* means "all files or directories beginning with a dot".
The Comment sources area list all possible source fields which could be used to fill the comment variable. Note that is the order of precedence. Check the one(s) where your image description is stored. If you check more than one then JAlbum will look in the selected fields if there is a text information. It stops searching as soon as a non-empty field was found. In the example above the value of the IPTC caption field will be used in case it's not empty, otherwise the value of the EXIF user field will be used. If both are empty the comment variable will remain emtpy too.
Recommended file and folder naming conventions:
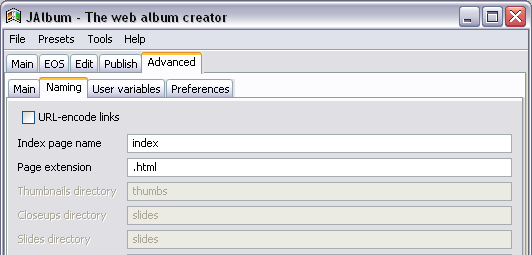
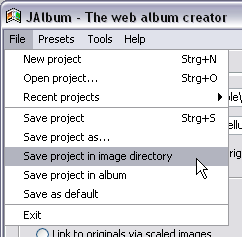
When you are done with customizing all the parameters in the interface I recommend to save the settings in a project file in the image directory. Note that this "project" is not related to the EOS project term. They're two different pair of shoes.
After generating your first gallery you can start customizing the template. Most features can be set by editing the file "settings.js" in the eoscommon folder. See also the F.A.Q. for more information.
Template Files
Template files are files which get scanned by the HTML generator. Tokens get replaced, Java commands are processed and rules will be applied to build a complete HTML gallery. There exists only one copy per template file in the template folder. However during the HTML generation process the image template gets applied to every image in your gallery, resulting in multiple image files (one per image) in the output folder.
Template
File Type |
File name in the
Template Folder |
File name(s) in
Output Folder |
Amount
|
| frame |
frameset.htt |
index.html |
1 |
| index |
index.htt |
index-frame.html |
1 |
| image |
slide.htt |
slides/<image-name>.html |
one per
image |
Furthermore all files in the "res_eos" subfolder get copied unchanged to the output folder.
Regenerate the Gallery
You need to re-generate the gallery when you make changes in...
- ... the image order.
- ... the image file names.
- ... the image selection (add or omit some).
- ... the IPTC data of the images.
- ... the HTML settings, like title, size, sharpening, watermark or quality.
- ... any of the three EOS template files (see above).
If you edit a file in the "res_eos" subfolder in the EOS skin directory which is not one of the three template files (*.htt) you have two options to update the gallery. Either copy the file to the output folder or regenerate the gallery (which has the same effect). Of course, you can also edit the file directly in the output folder but if you forget to copy it back to the input folder your changes will be lost after the next regeneration of the gallery. Changes in the "eoscommon" folder (v2.5) can be made any time and do not require a regeneration.
Note that always a new gallery is created when you change the output folder. JAlbum does not use the images from the old folder, instead it will create new ones for the new folder.
The button "Make album" is highly recommended. If you didn't change the settings for the web-sized images (size, quality, watermark) the available images will be used and just the HTML pages regenerated. That means a gallery with hundreds of pictures is updated in a few seconds - a huge time saver.
Top
|